Rocketerium Maxtermind is a Winner
By Jeff Curtis
Published: 2024-10-19
| Construction Rating: | starstarstarstarstar |
| Flight Rating: | starstarstarstarstar_border |
| Overall Rating: | starstarstarstarstar |
Rocketarium is known for their mid-power scale kits but this is one of their sport models with split fins. Rocketarium has great components and this kit is no exception.
Rocketarium BT-60 nose cone
BT-60 body tube - 18"
BT-60 body tube 6"
BT-60 coupler
24mm motor tube
2 BT-60x24mm center rings
4' engine hook
2 x 3//16" launch lugs
2 sets of 4 balsa fins
Kevlar shock cord.
This was an early version of the kit but I was surprised it came with a coupler and not a baffle, which is their norm these days.
Construction was straight forward. I started with the motor mount I notched the forward centering ring and fed the Kevlar shock cord through that. I knotted the end of the Kevlar so it could not pull through the centering ring. Tag end of the Kevlar cord was then embedded in the glue on the centering ring. I think marked the 18" tube for the fin locations before gluing in the motor mount. Next came the fins. With the split fins you need to take care to align each set of fins. While I used Titebond II for much of the construction, I use Aileen's Fast Grab tacky glue for surface mounted fins. It really does grab qrab quick and allows you to easily set the fins perpendicular to the body tube. It also allows you to do all the fins in one building session. I then used Titebond II for fillets.
I then glue the coupler into the 18" tube. Once dried, I glued on the 6 inch tube. I tied on a 12" elastic shock cord to the Kevlar using a sheet bend knot. This provides some give to the shock cord. I assembled a 15" parachute and attached to the nose cone with a snap swivel.
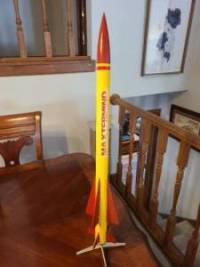
Next up was painting. I like the stock paint scheme and went with that. I like to paint the fins first as its then east to mask those. Once the masking tape was on I shot some red along the tape lines to prevent the yellow paint from seeping under the edge of the tape.
The decals are self-stick and are not as thin as I would prefer. They include one red stripe for just below the nose cone and a large "Maxtermind" for the body tube.
I've flown the Maxtermind once at the Muncie IN AMA field. It was the end of I long day and I was tire so I used a C11-3 to avoid a long walk. You need a spacer for C11 and D12 motors as it has the E-capable motor tube. The C11 had plenty of power but resulted in a fairly low 300-400' flight. The chute deployed nicely and descent was nice and slow. Just missed pavement and landed in the grass. I'll try a D on the next flight.
You can't go wrong with a Rocketarium kit. Excellent components and good instructions. My only complaint was the thick stickers. I had to use CA to tack down the edges of the Maxtermind sticker after the flight. The Maxtermind is a good looking rocket and as it floated down another flyer commented, "Ain't it purdy".
Rocketarium Maxtermind Reviews
Sponsored Ads


 |
 |